Our website has moved to a new hosting provider and we updated the Knowledgebase software to phpMyFAQ. Some content will be in different locations than before.
Our website has moved to a new hosting provider and we updated the Knowledgebase software to phpMyFAQ. Some content will be in different locations than before.
Author: Brandon Munday
Last update: 2017-10-29 23:02
As of November 2017, our three software utility programs, Tray Transpose Tool, TimeToStart, and ChordPlayer, are now free for you to download and use. They were designed and tested on older versions of Windows, but will still work fine on newer versions as long as you follow some fairly easy steps listed here: http://www.simusic.com/kb/index.php?action=artikel&cat=8&id=3&artlang=en
You can find the programs linked from our main page.
We will be charging for software support on a per-incident basis, but there is no charge for use.
Author: Brandon Munday
Last update: 2017-10-29 23:27
If you try to install a version of Worship LIVE! (or our other software) that was released before Vista, it will probably not install correctly, and will complain that certain files were not properly installed, and ask you to reinstall the software. That is a valid error - because Vista's "User Access Control" features try to prevent unauthorized software from affecting the operating system. But it's a little bit TOO aggressive at this attempt.
So be SURE to install it with administrator privileges - you must log into Windows as an administrator, or run the installer with admin privileges; installing it with limited privileges will usually cause problems properly registering files for the software to use.
Also, if you still have trouble, the software will run fine under Vista and Windows 7 if you run it in Windows XP compatibility mode. The software needs to have elevated privileges to run properly in Vista. Please review http://support.microsoft.com/kb/292533 on how to do this, or review our own KnowledgeBase article.
Author: Brandon Munday
Last update: 2017-10-29 23:17
Transposition is a very tricky business, even for a human. We put a lot of brain power into the job. Our software works very hard to simplify the process, and to make the results just what you'd expect, but there are some things you can do to make the chord spacing work out better in the end.
There are two basic types of fonts: proportional and non-proportional (aka Monospaced).
A font like Times or Arial is a proportional font. In other words, the width of each character is proportional to its size; an "m" is obviously wider than an "l", and a proportional font allows more width on a line for an "m". On the other hand, a font like Courier New is a non-proportional font. That means every character is given the same width on the page.
When you're working with chords on a typed page, you probably use tab characters or spaces to position the chords. This is where the transposition process becomes complex.
When you change the chords, you may end up with different numbers of characters - for example, if you transpose from the key of C to the key of B, a G will become an F# - two characters instead of one.
If you change fonts, the opposite happens - the width of the characters changes. A long line of lyrics will become much shorter if you change from Courier to Times - and the line of chords above it will become MUCH MUCH shorter because spaces are the narrowest thing in a Times font - so the chord alignment would become completely incorrect.
Of course, when you transpose or change fonts, you want the chords to stay right where you left them. Chords moving to a new position is obviously a bad thing. If you transpose a song in Courier, it's fairly easy for the transposition code to maintain chord spacing - if you change from Em to F#m, for example, you just delete one of the spaces after the chord, and then things to the right don't move around. (This works okay as long as there's not another chord one space after that!) But if the chord is in Times, then a space is not the same size as a letter. Two letters plus one space don't equal three letters. So it's VERY complex transposing a song in Times or any font other than Courier. It's also even MORE complex changing the font without changing the chord spacing. It's doable - the software manages okay - but even on a decently powerful home PC, it takes a second or two or five for the software to handle.
(This complicated work is well beyond the scope of the web-based software, which is why we don't include a formatted-text editor for the free Web Transpose Tool.)
So what can you do to make it easier?
First, the software will work much faster if you stick to non-proportional fonts like Courier or Monaco.
Second, once you've picked a font, stick with it. You can change the font, but you will find things shifting around a little bit, no matter how well the software handles the transposition.
Third, avoid using tab characters in your chording arrangements. Use spaces to align the chords.
Fourth, avoid the Arial Black font for anything with chords. Yes, it looks great for projection, and is really easy to read - but Windows often cannot accurately calculate the width of its letters (this is a Windows bug, not something in our software), and so the transposition spacing results will often be poor.
Finally, avoid using Bold fonts whenever possible. This changes the width of the characters, and makes the transposition spacing less accurate.
Hopefully, these tips will keep your font changes and transposition results looking their best!
Author: Brandon Munday
Last update: 2017-10-29 23:16
A common question is asked about Worship LIVE! transposition: "When I transpose a song, this or that line of chords does not transpose. All the other lines do."
The issue is usually some text added to the chords line, indicating a technique for the musicians or singers, like adding "(to Bridge)" or "Go to verse".
Our software will transpose any line containing ONLY chords. It tries to transpose every chunk of text in the song, first assuming it's a chord. Of course if it doesn't start with A thru G, it can skip right out. "Bridge" requires a bit more work - "B" is a valid letter to begin a chord - but "r" (the second letter) is obviously not part of any common chord - only m, #, b, 7, etc. would be appropriate. "(to" is also obviously not a chord... etc. So the software sees that some of the character groups on that line are not transposable, it simply skips the line.
This may seem a bit odd... why not just transpose the things that ARE chords? Unfortunately, some things that ARE chords are also real words - like "A" or "Am". As an example for why this won't work, what if we had a song containing the line "I am a Christian"? It would be odd to end up with "I Bbm Bb Christian".
There is one exception to this rule: the Worship LIVE! software has a "Ignored Terms" list, on the preferences tab of the same name. Anything on this list will be ignored during transposition, so it can exist on the same line as chords. Note that this list can contain only single words - so "(to Bridge)" can't be added without splitting it up into two separate entries.
Therefore, here's the workaround for this issue:
1) Move the technique notes to a lyric line
2) Add "(to" and "Bridge)" and "verse)" to the Ignored Terms list.
We recommend option #1, as a regular way of writing technique notes - always put them on a non-chords line.
Author: Brandon Munday
Last update: 2017-10-29 23:17
The Tray Transpose Tool software will normally run under Windows Vista and Windows 7 if you install with Administrator Privileges. To do this, right-click on the installer and select [Install as Administrator]. This is usually sufficient to allow the software to install and run properly.
If not, follow the steps below for further tweaks that may help.
Setting Up Windows 7 or Vista Compatibility Mode
Even if you install as administrator, some Windows Vista or Windows 7 installations may have problems running the Tray Transpose Tool, just because so much has changed under the hood from Windows XP days when this software was programmed. However, there is a compatibility mode that can be easily set.
To configure the compatibility mode, just locate the installation directory (it should be [C:\Program Files\Tray Transpose Tool\] and right click on the .exe file, selecting Properties from the menu.
Select the Compatibility tab:
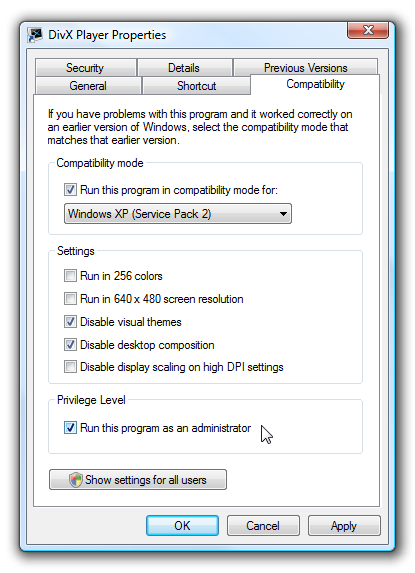
Set the program to run in [Windows XP SP2] compatibility mode, and check the [Run this program as an administrator] button.
Author: Brandon Munday
Last update: 2017-10-29 23:19
If you try to install a version of Worship LIVE! (or our other software) that was released before Vista, it will probably not install correctly, and will complain that certain files were not properly installed, and ask you to reinstall the software. That is a valid error - because Vista's "User Access Control" features try to prevent unauthorized software from affecting the operating system. But it's a little bit TOO aggressive at this attempt.
So be SURE to install it with administrator privileges - you must log into Windows as an administrator, or run the installer with admin privileges; installing it with limited privileges will usually cause problems properly registering files for the software to use.
Also, if you still have trouble, the software will run fine under Vista and Windows 7 if you run it in Windows XP compatibility mode. The software needs to have elevated privileges to run properly in Vista. Please review http://support.microsoft.com/kb/292533 on how to do this, or review our own KnowledgeBase article.
Author: Brandon Munday
Last update: 2017-10-29 23:17
"Hey! I'm a registered user. Worship LIVE! was running fine, completely unlocked, and now it's suddenly locked again. "
Worship LIVE! stores its unlock information in the Windows registry, and it encrypts that information based upon the network name of your computer (which you selected when you installed Windows in the first place). For this reason, several things can affect the unlock status of the software.
1. Did you change the network name of your computer under the Network:Identification:Computer Name control panel tab? Worship LIVE! uses this information to verify the registration information. You need to re-unlock Worship LIVE! (you DID save the unlock key and username, right?) and this will not happen again unless you change the computer name.
2. Did you reinstall Windows? The Worship LIVE! preferences, saved in the Windows Registry, may have been lost. Dig out that unlock key and user name (you DID save it, right?) and re-unlock.
To save you some frustration, the software stores the unlock information several additional places. As long as you have backups of these files, you may find them convenient.
1. A file named WorshipLIVE_UnlockInfo.txt in your My Documents folder. You can manually reenter the unlock codes.
2. An "unlock token" in your Application Data folder, usually located at
C:\Documents and Settings\ (your user name) \Application Data\SIMusic\WorshipLIVE
If this unlock token exists, simply drag it onto Worship LIVE's song list to unlock again.
Author: Brandon Munday
Last update: 2017-10-29 23:03
If you try to install a version of Worship LIVE! (or our other software) that was released before Vista, it will probably not install correctly, and will complain that certain files were not properly installed, and ask you to reinstall the software. That is a valid error - because Vista's "User Access Control" features try to prevent unauthorized software from affecting the operating system. But it's a little bit TOO aggressive at this attempt.
So be SURE to install it with administrator privileges - you must log into Windows as an administrator, or run the installer with admin privileges; installing it with limited privileges will usually cause problems properly registering files for the software to use.
Also, if you still have trouble, the software will run fine under Vista and Windows 7 if you run it in Windows XP compatibility mode. The software needs to have elevated privileges to run properly in Vista. Please review http://support.microsoft.com/kb/292533 on how to do this, or review our own KnowledgeBase article.
Author: Brandon Munday
Last update: 2017-10-29 23:17
Author: Brandon Munday
Last update: 2017-10-29 23:14
Transposition is a very tricky business, even for a human. We put a lot of brain power into the job. Our software works very hard to simplify the process, and to make the results just what you'd expect, but there are some things you can do to make the chord spacing work out better in the end.
There are two basic types of fonts: proportional and non-proportional (aka Monospaced).
A font like Times or Arial is a proportional font. In other words, the width of each character is proportional to its size; an "m" is obviously wider than an "l", and a proportional font allows more width on a line for an "m". On the other hand, a font like Courier New is a non-proportional font. That means every character is given the same width on the page.
When you're working with chords on a typed page, you probably use tab characters or spaces to position the chords. This is where the transposition process becomes complex.
When you change the chords, you may end up with different numbers of characters - for example, if you transpose from the key of C to the key of B, a G will become an F# - two characters instead of one.
If you change fonts, the opposite happens - the width of the characters changes. A long line of lyrics will become much shorter if you change from Courier to Times - and the line of chords above it will become MUCH MUCH shorter because spaces are the narrowest thing in a Times font - so the chord alignment would become completely incorrect.
Of course, when you transpose or change fonts, you want the chords to stay right where you left them. Chords moving to a new position is obviously a bad thing. If you transpose a song in Courier, it's fairly easy for the transposition code to maintain chord spacing - if you change from Em to F#m, for example, you just delete one of the spaces after the chord, and then things to the right don't move around. (This works okay as long as there's not another chord one space after that!) But if the chord is in Times, then a space is not the same size as a letter. Two letters plus one space don't equal three letters. So it's VERY complex transposing a song in Times or any font other than Courier. It's also even MORE complex changing the font without changing the chord spacing. It's doable - the software manages okay - but even on a decently powerful home PC, it takes a second or two or five for the software to handle.
(This complicated work is well beyond the scope of the web-based software, which is why we don't include a formatted-text editor for the free Web Transpose Tool.)
So what can you do to make it easier?
First, the software will work much faster if you stick to non-proportional fonts like Courier or Monaco.
Second, once you've picked a font, stick with it. You can change the font, but you will find things shifting around a little bit, no matter how well the software handles the transposition.
Third, avoid using tab characters in your chording arrangements. Use spaces to align the chords.
Fourth, avoid the Arial Black font for anything with chords. Yes, it looks great for projection, and is really easy to read - but Windows often cannot accurately calculate the width of its letters (this is a Windows bug, not something in our software), and so the transposition spacing results will often be poor.
Finally, avoid using Bold fonts whenever possible. This changes the width of the characters, and makes the transposition spacing less accurate.
Hopefully, these tips will keep your font changes and transposition results looking their best!
Author: Brandon Munday
Last update: 2017-10-29 23:16
• How can I move a song between two different computers?
• How can I copy the entire database for another user?
• How can I back up my database?
All of these questions have a similar set of answers.
Option 1. Use the Worship LIVE! software Export and Import features.
From the Edit menu, select Export, and then Entire Database for Sharing. Follow the prompts. This will create a single large file containing all the songs in the current database. Move this one file to the other computer, and follow the Import:Entire Database for Sharing option from the Worship LIVE! software's Edit menu on the new computer.
Option 2. Move the files from Windows.
The entire database is saved on disk, one file per song. At the bottom of the song list, on the status bar, is the folder of the currently open database - which contains the path on disk where the songs can be found. Open that folder from Windows. You can copy an entire folder full of song files to a floppy or CD-R or any suitable media, move it to any other location on your hard disk, etc. Note: make sure Worship LIVE! isn't running if you move or delete files; you may confuse Worship LIVE! if you try to use a deleted song! Also, see the KB article on CD backups.
Notes: Neither of these options export all the media files - any audio files you have linked to those songs. If you have lots of media files linked to your songs, you will need to ensure the file structure on both computers is the same, or you will need to manually re-associate the files. Option 1 is better if you don't care about the audio files, because it can automatically strip out the associations for you.
Author: Brandon Munday
Last update: 2017-10-29 23:15
You may ask "Several people use the church copy of Worship LIVE, but I'd really prefer that only I could add or delete songs."
Easy enough - set a Song Editing Password in the Unlock preferences. This is not really secure, since anyone can delete the password, but it is a strong indication that you want some control over the database. Remember, anyone can edit or delete the song files stored on disk without using Worship LIVE, so this password is merely a deterrent.
Author: Brandon Munday
Last update: 2017-10-29 23:15
If you back up your songs to a CD-R and later restore them, you may have trouble using the song files.
This is because Windows makes all files written to a CD-R into "Read-Only" files. Once marked this way, the files cannot be edited - meaning our software cannot rewrite or modify or delete the files, such as to increment the usage information, or save changes you make to the lyrics.
The software will warn you when a a song is read-only, but you'll still need to know how to fix this problem.
Close the Worship LIVE! software.
Open your My Documents folder, and find your Worship Songs folder within it. (Or, of course, find wherever your songs are stored.)
Right click on the entire folder of songs, and select "Properties" from the popup menu.
Near the lower left corner is a checkbox marked "Read-only". Click this checkbox until it is clear - not grey ("mixed state") or checked. Then click OK.
You should now be able to use your songs as before.
Watch a Flash tutorial on this topic at http://www.worship-live.com/tutorial_readonly.shtml
Author: Brandon Munday
Last update: 2017-10-29 23:15
A common question is asked about Worship LIVE! transposition: "When I transpose a song, this or that line of chords does not transpose. All the other lines do."
The issue is usually some text added to the chords line, indicating a technique for the musicians or singers, like adding "(to Bridge)" or "Go to verse".
Our software will transpose any line containing ONLY chords. It tries to transpose every chunk of text in the song, first assuming it's a chord. Of course if it doesn't start with A thru G, it can skip right out. "Bridge" requires a bit more work - "B" is a valid letter to begin a chord - but "r" (the second letter) is obviously not part of any common chord - only m, #, b, 7, etc. would be appropriate. "(to" is also obviously not a chord... etc. So the software sees that some of the character groups on that line are not transposable, it simply skips the line.
This may seem a bit odd... why not just transpose the things that ARE chords? Unfortunately, some things that ARE chords are also real words - like "A" or "Am". As an example for why this won't work, what if we had a song containing the line "I am a Christian"? It would be odd to end up with "I Bbm Bb Christian".
There is one exception to this rule: the Worship LIVE! software has a "Ignored Terms" list, on the preferences tab of the same name. Anything on this list will be ignored during transposition, so it can exist on the same line as chords. Note that this list can contain only single words - so "(to Bridge)" can't be added without splitting it up into two separate entries.
Therefore, here's the workaround for this issue:
1) Move the technique notes to a lyric line
2) Add "(to" and "Bridge)" and "verse)" to the Ignored Terms list.
We recommend option #1, as a regular way of writing technique notes - always put them on a non-chords line.
Author: Brandon Munday
Last update: 2017-10-29 23:17
Windows XP and newer versions of Windows all include an anti-malware system called "Data Execution Protection". It's designed to catch attempts by rogue software to execute code outside of Windows' security system. However, it is known to work TOO WELL in some cases, flagging legitimate programs and activity and instantly terminating those programs.
With Windows XP, this mode was optional and was turned off by default. With Vista and Windows 7 it became more common, and in Windows Server and all 64-bit editions of Windows, it is turned on by default.
Unfortunately, this DEP system can trip up the Worship LIVE! and other software, and cause it to quit unexpectedly and instantly, with no chance to save your work, and without even allowing the software to report the problem properly. You will get a generic Windows error but if you look closely you'll see the DEP warning at the bottom:


Fortunately, it is possible to turn off this DEP feature, either for ALL software (we don't recommend this) or for just the Worship LIVE! software (this is the best choice).
In windows XP,
In Windows Vista,
Note that 64-bit versions of Windows automatically enforce DEP for all programs.

If you want to define policy_level as AlwaysOn or AlwaysOff, you must do it directly via Boot.ini file as detailed below:
For more information:
http://support.microsoft.com/kb/875352
http://techblissonline.com/enable-disable-dep-in-windows-xp-vista/
Author: Brandon Munday
Last update: 2017-10-29 23:18
About three weeks ago (early July 2008), CCLI made major changes to their web site, which effectively were intended to block third-party software (like Worship LIVE!) from accessing the site directly. We have not yet determined what we need to do about this. Based on a long conversation with a CCLI administrator, it was clear that the changes were largely driven by the music publishers, not CCLI, who would very much prefer to allow us to access their site more easily. We hesitate to try to make the CCLI interface work when CCLI has intentionally blocked it - that would not be very appropriate for a Christian business.
For now, you can still use CCLI manually - logging in from their web page directly, then searching for songs and downloading the USR files as you always do. We will keep working on finding another easier method that honors CCLI and the music publishers' wishes, and let our customers know when we have some results.
You may wish to try the DelicateFade or IWillWorship searches too. These work well and were not affected by the changes made by CCLI.
Author: Brandon Munday
Last update: 2017-10-29 23:21
The projection and playlist screens are loaded with keyboard shortcuts. When you've got a playlist in projection mode:
You can jump between song verses with a number key. "0" will jump to the entire song. If the song has verses, you can hit 1 through 9 to jump to that numbered verse.
You can jump between playlist items with Ctrl-(number). For example Ctrl-3 will jump to the third item on the playlist. If the item has verses, it will jump to the first checked verse of the third item.
Page up and page down move up and down the playlist between checked items.
B blanks and unblanks the projection screen.
If you're using projection on a single-display computer, you can pop up a "quick find" list with Ctrl-F. A list of available song titles will appear in the lower right corner; you can start typing a song title to jump down the list, and hit Enter to immediately project the selected item.
If you're projecting a very long item without a background image (with a solid color background) you can scroll up and down the item with the up and down arrow keys, and the Home and End keys. (However, the Page Up and Page Down keys will still jump to the next or previous item on the playlist.)
Author: Brandon Munday
Last update: 2017-10-29 23:12
Choreography is a feature that can automatically sync projection changes with audio files. You can set up an entire playlist for one-click playback. Audio files will be played, the appropriate verses will be shown on the projection screen, and when it's done then the audio playback will stop. You can run an entire worship song set this way.
The basic steps to use choreography include:
1) Associate an audio file with a song
2) Set up choreography timings for that song
3) Add the song to a playlist
4) Project the playlist
5) Start the choreography running
We'll cover these topics below.
1. Associate an audio file with a song. See Changing Song Properties for details. Choreography will only work if the song has an audio file.
2) Set up choreography timings for a song. See this help page for details. Basically you create a series of timing events; each contains a time for the event, plus a type of event: a jump to another song, or a jump to a verse within the song, or blanking the screen. If you set a Next or Previous action in the song, the choreography will jump to the appropriate song when that event's timing is reached.
3) Add the song to a playlist. Use F9 or Add to Playlist.
4) Project the playlist.
5) Start the choreography running. To do this, click the green arrow next to the Choreography pane, to expand the pane. Click any verse of the song, and then click the Start Choreography button.
If audio playback is already running when you click the Start Choreography button, any subsequent events will simply happen. If the playback hasn't started yet, it will start when you click the button.
When a Next event or Prev event occurs, there must be another choregraphed song next (or previous) on the playlist. If not, choreography will simply stop, and the audio will continue. But if there IS another song to be choreographed, the currrent song's audio playback will stop, the subsequent audio file will begin, and the timing events for that new song will be played.
Author: Brandon Munday
Last update: 2017-10-29 23:13
As of version 6.0.17, Worship LIVE! is Vista-compatible.
1) Help file compatibility
To give you the most complete and useful help file (including context-sensitive Help), the Worship LIVE! help file uses the WinHelp32 file format. With Vista, Microsoft deliberately stopped including built-in support for WinHelp files. However, you can easily download and install the required software from the Windows website (sorry, but we are prohibited by Microsoft from including these files in our installer). If you try to launch the Help file from the Worship LIVE! Start folder, Vista will tell you about this lack of support; the message will include a link to the location where you can download the software.
You can read about this problem here:
http://support.microsoft.com/kb/917607
and you can download the software here:
http://go.microsoft.com/fwlink/?LinkID=82148
2) User Access Control
Vista's new security features prevent you from easily using one feature in the Worship LIVE! software. Normally, the Worship LIVE! installer will take care of this for you, but you may need the information below from time to time.
Worship LIVE! includes a built-in ability to associate the Worship LIVE! file types (song files, database files, and so forth) so that double-clicking or right-clicking on those files (from the Windows desktop) will use them with the Worship LIVE! software.
To use this feature, you need to run Worship LIVE! with elevated privileges. Simply do this by right-clicking the program file or shortcut and then clicking Run as Administrator. When you run with elevated privileges, you will need to dismiss a User Access Control prompt.
If you'd like more information about the User Access Control and running as administrator, this is a good resource:
http://articles.techrepublic.com.com/5100-10877_11-6139428.html
Author: Brandon Munday
Last update: 2017-10-29 23:12
Worship LIVE! version 5.1, included significant upgrades to the playlist.
Changes of note are:
- Automation features (formerly called Choreography). Automation offers the ability to completely script the playlist, including jumps between items and user-selectable timings for each item, for true one-click song services. (By contrast, Version 5.0 included basic automation features, but not the ability to jump back and forth, no ability to control the action at the end of each song, and rather limited control over the duration of an item.)
- Slideshow Helper. Along with the basic Automation features, we've added a Slideshow Helper. This will help you pick an audio file and any number of images, create an automated playlist, and even launch projection if you wish. Just a few clicks, and a whole folder full of images will be looping with music for your congregation.
- Powerpoint interface upgrades. When a Powerpoint file is added to a playlist, Worship LIVE! reads its contents and shows each slide as a subitem. It also shows the number of click animations in the slide, and shows previews of each slide as you move your mouse cursor over each item (just like all the other playlist items). The Next and Prev buttons on the playlist window now control the Powerpoint playback, just like other playlist items. In short, the Powerpoint features are much more tightly integrated into the rest of the playlist.
- Easier addition of items. When you select an item to add, Worship LIVE! will remember that item type and you can repeat the action with a single mouseclick on the Add toolbar button. Also, you can now select multiple files of any type to add all at once.
- Fully selectable playlist columns. You can now pick which columns you'd like to appear on the playlist. The only fixed column is the Title column.
You can view a preview screenshot of the updated playlist at http://www.worship-live.com/images/version51preview.gif
In particular, note that the Powerpoint file now shows its slides on the playlist, and also notice the icons and descriptive text in the Automation column.
If you wish to use automation or you heavily use Powerpoint files in your playlists, and you're interested in helping to beta test this new version, please contact us via http://www.simusic.com/contact.html
Author: Brandon Munday
Last update: 2017-10-29 23:22